

Lesson Plans
Return to Lesson Plan Index
Printer Friendly Version
Making a Model Lung
Grades: 2-5
Author: Diane Zak
Source: Making a Model Lung, The Model Lung
Abstract
In "The Model Lung" lesson students will construct a simple model of the human lung and use this model to identify the structure and function of the lung. In the lesson extension, students will model and research malfunctions to the respiratory system due to illness or disease.
Objectives
What should students know as a result of this lesson?
- Students should be able to explain the parts of the body that are involved in the process of breathing.
- Students should be able to explain the structure and function of the lungs.
What should the students be able to do as a result of this lesson?
- Students should be able to make, interpret, and explain a model.
Materials
There is advance preparation for this lesson - please see the procedures.
(per person)
- 1 Clear plastic water/pop bottle (20 oz. size)
- 1 Large balloon or a piece of plastic from a trash bag or shopping bag (about 7 x 7 inch square)
- 1 Small balloon
- 1 Rubber band
- Scissors
- Masking tape
- Reference books with lung diagrams
For teacher's use only: Craft Knife
Procedures
Engagement
Advance Preparation:
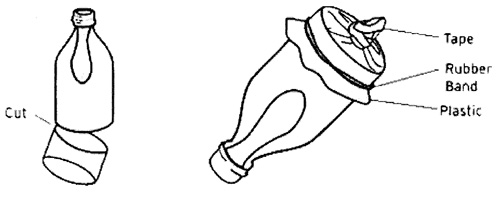
Collect plastic bottles. Cut a small starter slit in the bottle just past the bottom part of the bottle that bulges, parallel to the bottom.
Pre-Assessment:
- Ask the students to place their hands on both sides of their rib cage. Have them take several deep breaths. Ask them to describe what they felt as they breathed in and out. (They should feel their rib cage move up and expand while they breathe in, and move down and return to its original size when they breathe out.)
- Do a pre-assessment of the students' understanding of the structure and function of the lungs.
- Can you explain what the lungs look like? (The lungs are two spongy bags)
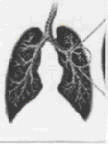
- How big are the lungs? ( About the size of footballs)
- Where are the lungs located? (Between the ribs; in the chest cavity)
- When you took several deep breaths the lungs got larger and then smaller. Explain how this happens. Possible answer from the students: When you breathe in the lungs are filled with air and get larger; when you breathe out the air leaves the lungs causing them to get smaller. (The lungs do not contain muscles and are unable to expand and contract on their own. The diaphragm, which forms the floor of the chest cavity, is a group of muscles that control the size of the lungs. When you inhale, the diaphragm contracts and drops down. This lowers the air pressure in the chest cavity which causes air to enter the lungs, causing them to expand. When the diaphragm moves up, the air pressure increases and causes the lungs to contract forcing the carbon dioxide air out of the lungs.)
- What is the purpose of the lungs? Possible answer: to help you breathe; when you breathe in the lungs take in oxygen; when you breathe out, the lungs get rid of carbon dioxide.
- Can you explain what the lungs look like? (The lungs are two spongy bags)
Assessment: Monitor the responses of the students to your questions to assess their preliminary ideas about the structure and function of the lungs. Do not correct students' responses at this point in the lesson - after students manipulate the model and class discussion follows, you will have an opportunity for this discussion.
Exploration
Procedure:
- Use scissors. Start at the slit and cut off the bottom of the bottle.
- Push the end of the small balloon through the mouth of the bottle.
- Stretch the mouth of the balloon over the mouth of the bottle.
- Place the mouth of the large balloon over the bottom, open end of the bottle. Tape it securely to the bottle.
Option: Instead of using the large balloon, use a piece of plastic. Fold the plastic square two times. Take the folded corner, twist it, and using masking tape, tape about 1 inch of it to serve as a handle. Using a rubber band or masking tape, secure the plastic "handle" tightly to the bottom of the bottle. The plastic or balloon should fit loosely.
Use Part One of the worksheet:
- Hold the bottle and push in and pull out on the handle. Watch the small balloon inside the bottle. What do you observe?
- While moving the handle in and out, hold the opening of the bottle near your face. What do you feel?
- Describe what happens to the balloon, inside the bottle, as you move the handle in and out. Explain your observations.
Assessment: Monitor students' work to check that they are carrying out procedures carefully, making observations, and recording data accurately. Redirect their attention to the task, as needed. Make sure that students are employing safe practices as they conduct the activity. Answer students' questions regarding procedures.
Explanation
Teacher displays a diagram/model of the lung; students find a diagram/model on the Internet or using reference books and/or posters, compare their model of the lung to the human lung.
Use Part Two of the worksheet:
Which parts of the model lung represent the lungs, chest cavity, rib cage, and diaphragm? (The small balloon inside the bottle represents the lung. The bottle represents the chest cavity and the rib cage. The plastic /balloon handle represents the diaphragm.)
Be sure to explain to the students that the lungs consist of tiny air sacks that function in breathing - the balloon-model cannot show the structure of these parts of the lungs, but mostly shows the function of the diaphragm in the process of breathing.
Assessment: Listen to the students' accounts of their findings to judge if their reports are supported by the findings that you observed as experiments were being conducted. Ascertain students' knowledge of the structure of the lungs by asking questions. Explain how the human lung works using the model to demonstrate the structure of the lungs and the step-by-step process of breathing. Monitor students' answers to questions asked in the discussion about the structure of the lungs, for completeness and accuracy.
- Explain what happens to your rib cage when you breathe in and out. (Expand and compress)
- Where are the lungs located? (Chest cavity/rib cage)
- Why do we have lungs? (to breathe, take in oxygen, get rid of carbon dioxide)
Elaboration
Use Part Three of the worksheet:
Having a cold and some respiratory diseases sometimes causes extra mucus to form in the lungs. To explore the effect this extra mucus has on the lungs, add one spoonful of water to the small balloon inside the bottle. Push and pull on the handle and observe what happens.
How does the extra "mucus" affect how much air can be inhaled?
How has the added water affected the capability of the lungs to perform correctly?
* Older students might research several respiratory diseases such as bronchitis, asthma, and emphysema. What is their cause, and how do they affect the lungs and breathing?
Literature:
- The Lungs by Susan H. Gray (2006) Published by The Child's World Minnesota
- Kaleidoscope The Lungs by Suzanne LeVert (2002) Published by Benchmark Books/Marshall Cavendish Corp. New York
Assessment: Ask questions to ascertain students' understanding of how the lungs can be affected when a person has a cold or a respiratory disease.
- How many of you have had a cold or bronchitis?
- How did your chest feel when you had the illness?
- How was your breathing affected?
- Explain why you felt more tired?
- What precautions can you take to help from getting a cold?
Prerequisites
Students who have comprised motor skills will need assistance in completing the procedures.
Best Teaching Practices
- Inquiry
- Hands-on Teaching
- Questioning
Alignment with Standards
NGSS Standards:
- 4-LS1-1 Construct an argument that plants and animals have internal and external structures that funtion to support survival, growth, behavior and reproduction.
National Standards:
- Content Standard A: K-4 Unifying Concepts and Processes
Ohio Standards:
- Scientific Inquiry
Content Knowledge
- The ribs' function is to hold the lungs within a closed, inflexible, solid box.
- Lungs have no muscles, therefore they cannot move themselves. Changing air pressure outside the lungs is the only force that moves them.
- At the bottom of the rib cage is the diaphragm, a solid muscle.
- Below the diaphragm is your abdomen, which holds your stomach, liver, bladder, and intestines.
- The diaphragm is like the "handle" that pushes up or pulls down. You push up your diaphragm when you suck in your stomach. That squeezes your lungs, causing you to exhale, because there is less space in the rib cage. (If the rib cage was not stiff, the lungs would not be squeezed.)
- Pulling the diaphragm down causes the lungs to inflate since there is more room inside the rib cage.
- A breathing machine changes the air pressure outside the lungs causing air to move in and out.
Safety
Remind students to use materials for their intended purpose.
Always hold the point of the scissors when handing them to someone.
There is no horseplay in the science lab.
The teacher should use the sharp tools to make cuts in the bottles.
Applications
- Respiratory diseases
- Breathing Machine
- Life
Assessment
The students will create a poster illustrating how the human lung works.
The students will label the various parts of the lung. They will also summarize the process of breathing.
Other Considerations
Grouping Suggestions: Each student will make his/her own model lung.
Pacing/Suggested Time: This activity will take 2-3 class periods. Time depends on how much time is spent on elaboration.
Printable PDF Worksheets
AGPA K-12 OUTREACH
- AGPA Home
- Zip into Science with Professor Polymer (Video Series)
- Rubber Band Contest for Young Inventors
- Akron Regional Science Olympiad
- Lesson Plan Library
- Best Teaching Practices
- Video Resource Library
- Professional Development Modules
- Other Resources
- Ohio Science Standards
- Contact AGPA
- Other Polymer Links