
Return to Lesson Plan Index
Printer Friendly Version
Grades: 5-8
Author: Dr. Katharine Owens
Source: Adapted from Chemecology Vol. 22, March 1993 (Chemical Manufacturing Association publication); content material adapted from Science & Technology Vol. 85, October 15, 2007
In this lesson, students will test the strength of different sticky tapes, such as duct tape, cellophane tape, medical bandage tape, and painters' tape, by performing tests in which they will take measurements, record data, and report their findings. They will explain how the usefulness of a manufactured product depends on its function for a particular purpose. Content information includes a discussion of types of adhesives and the mechanisms by which they work.
What should students know as a result of this lesson?
What should the students be able to do as a result of this lesson?
Engagement
Play a version of 20 Questions to open the lesson:
If students have not yet guessed that the material is "duct tape", hold up a roll and ask them to identify the material. Ask students if they think duct tape is strong. Are there tapes stronger than duct tape? How could we test the strength of duct tape? Ask students for their ideas - what procedures would they use to test the strength of various tapes, given the materials at hand (show students the collection of tapes, paper bags and marbles/coins).
Assessment: Monitor students' answers to your questions to be sure everyone understands the goals of the lesson. Before proceeding, be sure that students understand the posed problem.
Exploration
Do a quick demonstration of how to set up the equipment for testing the strength of the tapes to be tested.
We recommend that about 4 inches of tape be used and that tapes are approximately the same width. This may necessitate that the teacher tear strips of wide tape into widths about equal to that of cellophane tape. Attach about 2 inches of one end of the tape to the open end of the paper bag so that the bag hangs open when you hold the top of the bag. About 2 inches of the other end of the tape should be attached to the top edge of the table/desk/work surface. Repeat this process for each of the four tapes and bags that will be used for the tests. When all the bags are hanging from the table, have students predict how many marbles it will take before the tape releases. Begin the test by putting marbles into the bags one at a time. Just allow the marbles to drop slowly into each bag. Continue putting marbles into the bags until they release from the table. Take a count of the number of marbles and record the data.
Assessment: Monitor students' work to check that they are carrying out procedures carefully, making observations, and recording data accurately.
Explanation
Have students report their findings. Ask students to report what surprised them about the results. Did their data support their predictions? Which one of the tapes chosen was the strongest in this test? In the discussion of the findings bring out that their tests only examined the strength of the tape when used between a table top and a paper bag. Manufacturers of the tape would have to test how strong the tape is when stuck to other surfaces before marketing the tape as effective on wood, plastic, paper, and other surfaces. Explain that there are many tests that products undergo before they come to our stores' shelves. Explain to the students that tapes are manufactured for specific purposes - some like duct tape need to be very strong and water-resistant, while others like blue painters tape must release easily and not take paint off of the wall when peeled off.
Assessment: Have students explain how the usefulness of a manufactured product depends on its function for a particular purpose. As an example, show the students various kinds of paper fasteners, like binder clip, paper clip, rubber band, staple, and brass paper fastener. Ask students to describe the uses of each. If they needed to fasten 50 sheets of paper together, which fastener would they choose and why would they find the others to be not useful.
Elaboration
Conduct a discussion about adhesives and how these work. See the "Content Knowledge" section of this plan.
Assessment: Ask students to set up a test of tape strength on surfaces other than the table/desk top. Collect data and compare to the previous test.
Complete a data table; make graph using collected data; use the Internet to search for information.
NGSS Standards:
Common Core Standards:
National Standards:
Ohio Standards:
When dissimilar materials bond together we say that they exhibit the property of adhesion (for example, water on glass, paint on a wall, or frosting on a cake). When similar materials bond together we say that they exhibit the property of cohesion (for example, in clouds tiny water droplets join together to form rain, packing tape that wrinkles as you pull it off the roll sticks to itself and becomes hard to pull flat, or wet sand grains stick together to let us build a sand castle).
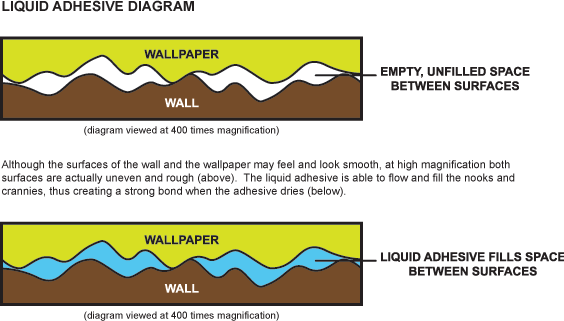
Adhesives should have two properties - they should be "liquid like" so that they can flow across a surface to fill in tiny pores on the surface (see diagram below). Adhesives should also be "solid-like" to give high strength. They can be "wet", that is viscous, as in glue and paste or "dry", such as static cling. Liquid adhesives can flow between two surfaces (a wet piece of paper can stick to a window glass surface for a short time, but when it dries, it falls off), but for a liquid to act as an adhesive it must have strength. Try this: spread honey between the surfaces where you want to join two blocks of wood. As a liquid adhesive because of its viscosity, the honey sticks fairly well. Then put these blocks into the freezer and examine after the honey has frozen. What do you predict will happen?
Adhesives bond items together. There are natural adhesives made from plant matter such as starch and animal matter such as casein. Synthetic adhesives can be elastomers, thermoplastics, or thermosetting adhesives. Drying adhesives, such as white glue or rubber cement, consist of a mixture of polymeric materials in a solvent. When the solvent evaporates, the adhesive hardens. To be effective boding agents some adhesives require that the two surfaces be spread with the adhesive, which must dry for some time before the surfaces can be put together. This kind of adhesive is used in the making of shoes. The hot glue gun is an example of a hot adhesive a thermoplastic material that hardens upon cooling.
Pressure-sensitive adhesives (tapes) can be either permanent (tapes used in construction) or removable (wound care dressings, athletic tape, price labels).
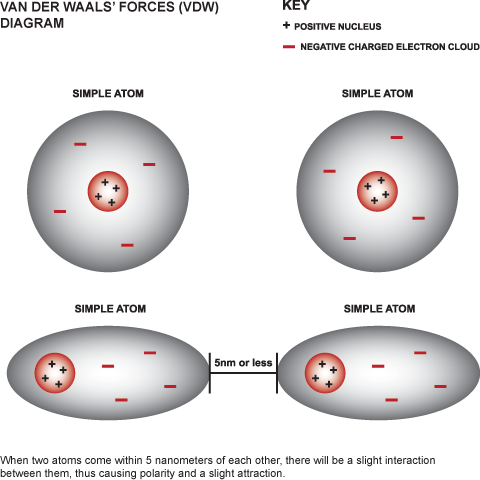
Mechanisms of adhesion:
Remind students to use all substances for their intended purpose. Dispose of all testing tapes and, if you cannot recycle them, plastic bags in the waste basket.
Adhesive tapes are a commonly used product around the home, in school, at work, in hospitals, and in industry. Tapes are made for various purposes so their holding strength varies. See Content Knowledge section.
Set up the following demonstration. You will need four small blocks of wood, about 2 T honey, and access to a freezer. Spread about 1 T honey between two blocks of wood and put in the freezer overnight. Next day, spread 1 T honey on one surface of a block of wood and put another block of wood on top. Show the students the two "glued together" sets. Ask students to infer which of the sets is glued together more strongly and to give a reason for their inference. After they have reported their inferences, ask a student to test the strength of each set of glued blocks to report which set can more easily be separated. In their science notebooks, students could draw pictures and write explanations to accompany this demonstration.
Grouping Suggestions: Groups of four recommended: materials manager/waste disposer, product tester, data recorder, and results reporter. Take care to group students to ensure a diverse mix of ability and talent.
Pacing/Suggested Time: Introduction, testing, reporting, discussion, and assessment - 4 days
